Organizing to Work From Home: Your Routine

It can be challenging to work from home and still be productive. There are more distractions (kids, snacks, the couch!) than you usually have in the office, yet you still have to meet work expectations.

With so many of us now forced to WFH, here’s how to ease the transition and keep it all together.

  • Have an intentional workspace (not just the laptop in bed)

  • If you do have an office area, avoid getting up and going right to your work computer in your PJs

  • Try to stick to some familiar routines: shower, get dressed, eat breakfast, get your cup of coffee before you start working

  • Do take breaks to get outside for a walk around the block or just hang out in your yard for a few minutes; studies, like this one, have found that a “green break” can be good for you and your productivity

  • If you and a partner are both trying to work and take care of the kids at the same time, make a schedule of who’s “on” to help with the kids around daily work calls and project priorities

  • Be sure to keep in touch with your manager/your team throughout the work week

iStock_000000547220XSmall.jpg

Organizing to Work From Home (WFH): Your Space

In our current reality, you may now be unexpectedly working from home. Here’s how to get your WFH space organized for success.

If you have an office or dedicated room to work in:

  • Make sure you have a clear space to work. This could be an actual desk, or a temporary table set up in the space. If the desk/table isn’t clear, for the time being you have permission to move off the “stuff” into a box and go through it later.

  • Have the supplies you’ll need within easy reach, such as phone, note paper, pens.

  • Do you need a whiteboard in your space for sketching out ideas? (You may have on in another room you can borrow temporarily.)

  • Working via video conference? Check your spot for good lighting and pay attention to what’s behind you if your webcam is on.

coffee-smartphone-desk-pen.jpg

If you don’t have a dedicated room to work in, you can:

  • Create a temporary workspace in the corner of another room. A card table in the living room, comfy chair in the bedroom, or kitchen counter.

  • Set up a mobile workstation. Gather your supplies in a bin or basket and have it handy, wherever you work. This is similar to my idea of a homework workstation, gather what you need and leave it in the bin.

For any work space:

  • Take stock of your computer set up: do you need a headset, webcam, or monitor? Again, pay attention to lighting and the background for any video conferencing.

  • Don’t forget to be sure you have a powerstrip and cord control. One of my favorite items to contain the cords is the CableBox.

  • Use a comfortable (and ergonomic) chair.

  • Have something that makes you smile - a photo, drawing, or other object - in your workspace.

  • Don’t scatter your papers and supplies around the house, especially if you have other family members working from home. Try to keep work things contained.

Crafty Storage

Craft closets are one of my favorite organizing projects! I love turning the jumble of items into cohesive order, which then helps my clients be more creative. If you can find your supplies, you can work on your craft projects!

This client had different kinds of craft items to corral, including paper projects, stamping, wrapping paper, beading, and balloon making. I forgot to take the “before” shot, but we enjoyed looking at the “after” once we were done.

Fortunately the client had a reach-in closet which makes it very easy to see what she has - at least once items are stored in bins and the excess was cleared. We also tried to store items that get used together next to each other.

Here’s another post on how I organized my own craft closet. If I can help you boost your creativity by organizing your craft or hobby supplies, send me an email.

20190316_163721802_iOS.jpg

From To Do to Done

TO Do pad.jpg

I'll admit it: I love lists. I enjoy checking off when things get done. Generally I keep an electronic list, but I use notepaper or sticky notes for my daily/weekly reminders. While at The Container Store recently, I was pleased to see this new To Do notepad from Poppin. The design and color make me happy...and maybe will help me want to do what's on the list!  (If we like a product, we tend to use it more.)

Tips on Making an Effective List

Getting your To Dos Done

Colorful Filing

I often advise clients to use color when organizing if it makes them happy. While there have been colorful file folders for a while, I was so excited to see the bright and beautiful filing cabinets now available. Check out what I found at The Container Store. These happy colors could almost make anyone want to file!

20180121_194525040_iOS.jpg
20180121_191925728_iOS.jpg

How to Clear the Corner Clutter?

Corners are magnets for clutter! Things seem to end up in the corners of our rooms, often in piles, bags, or boxes. If you really want to clear the clutter, take a look at what's hiding out in the corners.

Here’s how to get started:

Bookstack.jpg
  1. Pick one corner to tackle. Set a timer for 30 minutes.
  2. Pull everything out. Toss and recycle what you can.
  3. Put items in categories, and put away what you can.
  4. Consider each item and why it ended up in the corner. Does it not have a place to go? Or is the place it goes over stuffed? Does the item require an action? Is it in transition to go somewhere else (to be donated, to a friend, to a family member)?
  5. Deal with each of the items. If they have to go into a space that is overstuffed, put it in the area and then schedule another time to declutter that space. You can also schedule time to follow up and make decisions or add the action items to your To Do list. If items are going out, put them near your door or in your car and resolve to pass them on within a week. 

Once you’ve been able to clear the clutter in your corners, enjoy your space! The room will feel more open and peaceful.

Easy Paper Organizing: Deal With and Done Boxes

This clever idea comes from a friend who recently moved. She set up this new paper management system near where she opens mail and pays her bills.

Here's how the simple system works: she opens her mail, weeds out all the junk, and then puts the paper in the appropriate box. "Deal With" means just that = paper that needs to be acted upon (bill to pay, form to fill out) and "Done" = file. When Done is overstuffed, she knows it's time to file the papers she wants to save. 

This is a great system for people who need visual reminders, and helps combat the creation of piles. The boxes can also be quickly tucked away if needed. 

Hidden Labels

Want to let everyone in your house know where things go, but don't like the look of everything labeled? 

Try putting the labels inside a drawer or cabinet. A client and I set up these useful labels all along the inside rim of her utility drawer. Now the whole family will know where to find what they are looking for.

Receipt Organization: The Shredder Solution

While working with a client to de-clutter his bedroom, we discovered that one problem area was receipts. Like many men (my husband included) the client emptied his pockets in his bedroom, which meant that change, small papers and receipts ended up on the flat surfaces, stuffed into drawers, and all over the space. We brainstormed strategies to keep the surfaces clear, including bowls to hold change and receipts, a wastebasket, and even a shredder.

When I returned to this client's house I was thrilled to see that he had a low cabinet in place now, providing room for a charging station, a bowl for change, and a small sleek shredder! The Bonsaii Desktop Shredder is small enough to fit in the space, and its modern styling is a perfect fit for this client's decor.

This illustrates an important organizing concept: keep the tools you need (shredder, wastebasket) as close to where you use them, even if this means you have duplicates. The client had a shredder in a downstairs office, but the process of gathering receipts and taking them downstairs to shred was cumbersome and just didn't happen. The client was determined to keep his bedroom surfaces clear, and this receipt shredder is a perfect solution.

Organizing Receipts, Warranties & User Guides

Recently we had a week where it seemed like everything was breaking: my car, the garage door, and our back door lock. While looking for the receipt for the door I realized that my house information was in too many different spots. I had the papers saved in some files and binders, but couldn’t quickly find what I had needed. Time for a new system.

First, I gathered all the information I could find into a pile.

Then I started to sort,making piles for the warranty/user guide information, for receipts, and for other bills related to home maintenance.

My pile turned into the following files:

IMG_5462_thumb.jpg

1. Owner Manuals file: this includes warranties and all the information that comes with a new device or appliance. 

IMG_5461_thumb.jpg

For large purchases, like a TV or washing machine, I recommend stapling the purchase receipt right to the user guide/warranty information. If something happens to break under warranty you’ll have all the information you need in one spot.

2. Home Maintenance and Improvements file: This is where the receipt for the door went, along with all the other work we’ve had done on the house such as window replacements, carpet installation, and painting. This file will help me recall who did the work and when, and also helps us to keep track of improvements we’ve made to our property.

3. Outside Improvements file: This is for any major outside projects, such as our fence installation and patio.

4. Important Receipts to Keep: This is a bit generic, but any purchase receipt that I want to archive goes here. This includes receipts for lighting, furniture, electronics, and a few sentimental receipts.

Each category is a hanging file in my file cabinet, right next to each other. If I’m looking for product information or an important receipt, it should be in this section of the file cabinet.

If you want to set up a similar system but don’t know how to get started, contact me today at 617-905-7762

The Saved Piece of Paper that Changed my Career

Recently I was going through my own files to shed excess papers and projects that no longer fit my goals. I came across an article and wondered why I had kept it, until I noticed a note I’d written at the top: “This is the article that inspired me to become a professional organizer.”

The article was from a 1998 American Way, the American Airlines inflight magazine. Back then I managed volunteer teaching programs in Africa and Latin America. I spent a lot of time traveling on American Airlines back and forth from Boston to Miami, and sometimes on to Costa Rica and Ecuador.

This article was the first time I heard the term, "profesional organizer" and learned that it was a growing field. Although I loved my job something in this article spoke to me at the time, so I pulled it out an threw it in my “career” file.

I found that file and article years later, when I was a Product Manager for a large education company and was ready to move on. The article mentioned NAPO, the National Association of Professional Organizers. I joined NAPO, took courses, and realized helping others get organized (and love their homes again) was my passion.

Sometimes it pays to keep a piece of paper—if you know why it’s important. If you have a document that’s important or a piece of memorabilia, jot down the significance. 

Organizing Maps & Travel Brochures

Do you still keep paper maps and travel brochures? I have to admit that I do. I keep a few for sentimental reasons (Paris restaurants, Geneva map) but also keep selected maps and brochures from places that I plan to visit again.

During one of our many snow storms last month I was looking for something in the attic and found a box half-full of travel maps and brochures. I decided this would be a good blizzard organizing project. (I could also dream of warm summer vacations ahead…)

Here’s what I did:

  • First I dumped all the brochures our on my dining room table. A few were sorted by place so I kept those together.
  • I reviewed all the maps and brochures and recycled a good amount.
  • Then I sorted what I wanted to keep by location.
  • I was hoping to put the maps/brochures into a blue accordion file I had (see corner of photo) but there were too many for the file.
  • Next I the thought of keeping everything together by rubber bands, but some piles were too large.
  • Finally I decided to use one of my favorite organizing tools: gallon size plastic bags. Easy, and the bags had a spot for a label.
  • All the bags were “filed” into a plastic bin back into the attic, waiting until the next trip is planned.

What’s great about this system is that for our next trip to VT, I just have to pull out the bag labeled VT and enjoy looking at all our favorite places.

AFTER: Organized into bags and ready to go!

Reduce Unwanted Mail and Phone Calls: Get off the Lists

I noticed that this past December I got a ton of catalogs, many more than I had ever ordered from. I also seemed to be getting a lot of unsolicited phone calls to my home phone. 

Time to get off the lists, and sign up (again) for the national “do not call” and “do not mail” registries. These lists are only good for 5 years so if you find yourself getting a lot of unwanted mail or calls, it’s probably time to re-register your information.

Here are my favorite resources:

And here's one to try for unwanted email subscriptions:

unroll.me

.  

7 Tips & Tricks to Organize your Gift Wrap Supplies

1. Want to get your gift wrap supplies in order?  The first step is to gather all the wrapping paper, bags, cards and other supplies you have in one place.  Once you have it all together, reduce it to at least half. Yes, half! In most cases you aren't going to need all those gift bags you've saved. And if you love gift bags, you probably don't need all those rolls of paper. 

2. Store the supplies you are keeping in one place. Here are some different ideas:

  • I use the Rubbermaid Wrap-n-Craft that fits into my closet
  • Stand up rolls in a wine crate or wire wastepaper basket
  • Store wrapping paper rolls in a hanging garment bag; I haven't tried this but it's a creative idea to get supplies off the floor
  • Try pantry shelving designed for the back of a door

3. Recycle the gift wrapping supplies you aren't using, pass them on to a friend, or even donate the wrapping paper. Goodwill may take it, as will some thrift stores or charities that wrap gifts to give at the holidays. (Here is one Boston charity that can use wrapping supplies.)

4. Simplify the whole gift wrapping process with a "signature" gift wrap: use just one kind of paper or gift bag for all gifts. You can personalize with fun cards or ribbon.

5. Reuse. Turn old maps into gift wrap. A client recently told me she saves maps of certain places, like London, Paris or Harvard Square, to use as wrapping paper. It's especially fun for graduation gifts. You probably don't navigate with your paper maps too often, so consider reusing some as gift wrap.

6. Get into the zone. If you are wrapping a lot of gifts at one time, set up a wrapping zone in your office or dining room.

7. Party; throw a gift-wrapping party that is. Each December a friend invites a group over to eat, drink and wrap. Everyone shares wrapping supplies. It's a fun way to get that chore done.

This article first appeared in the November / December 2014 edition of my newsletter, The Neat Sheet.

How Do I Get Rid of: TVs & Computer Monitors

Older TVs and computer monitors can be heavy and bulky, and because they have cathode ray tubes, or CRTs, with toxic chemicals they can’t just go out with your trash. This means they end up in the corners of our homes gathering dust. I find often find them tucked under a chair or table in the family room, the office, or even the basement.

So how do you get these out of your house?

  • If you are getting a new TV delivered, many companies (like Best Buy) will remove and recycle the old one for you.
  • If you can’t take advantage of a take-away service, then check with your town to see if they offer a CRT recycling program. In my town you can bring your TV or monitor to the Department of Public Works and for a small fee, they will dispose of it for you. For a larger fee, the DPW will pick up the TV curbside in front of our homes, a few times a year.
  • Want to donate your old TV (especially if it still works) or computer monitor? The Salvation Army also accepts electronics/appliances, including TVs and computers, and many Goodwill locations are now taking computers.

You’ve got no excuses now to get your TVs and old computer monitors out of your house.

How Do I Get Rid of: Cell phones

While working with clients to de-clutter, we inevitably come across old cell phones that are no longer used but are just sitting around. How to get rid of them?

My husband and I tackled this question recently. As we continue to clean out our basement, we found four ancient cell phones (see photo!) that were ready to go. These phones had been hanging around for years, so we finally decided to get rid of them.

First we made sure any data and personal information were erased from the phones. We knew that the photos and contacts were backed up, and were able to set the phones back to their factory settings, getting rid of the data (a quick online search helped us figure out how to do the re-sets, especially on the ancient Nokia phones, but it worked). Don’t forget to take out the SIM card if your phone has one. Good information about cleaning data off your phone is here.

Then when I was doing a bunch of errands, I dropped off the phones at our local Sprint store. So easy.

There are many options to get rid of your unwanted phones. If your phone is a newer model, you can:

  • Trade it in – check with your phone carrier.
  • Sell it, through a service like Gazelle.
  • Pass it on to a friend.
  • Donateit to an organization like Cell Phones for Soldiers or find a drop-off location near you that supports a local charity through this website.
  • Many schools and non-profits offer an “electronics recycling day” where you  drop off your phone (and other electronics) for free.  My town has a recycling day every spring and fall, so check with your local city or town.

Usually I see cell phones (like mine) that are just too old to sell or trade it, so they really have to go. Check with your cellular company about their recycling programs. Other places to recycle phones include Staples, Best Buy and even Target.

Organize Your Safe Deposit Box

Safe deposit box: do you have one? If you do, do you know what’s in it?

When I had to get a copy of my daughter’s birth certificate recently, I found that I didn’t know what important documents we had at home, and what we kept in the safe deposit box.

This is one of those less-fun organizing projects (even for me), but one that is critical for every family.

  • First, make sure you have one place at home for the important documents you may need quick access to, such as passports, birth certificates, and your original wills. Gather these documents and get them in one place that you will remember. One client calls this folder her “proof of identity” folder; it’s a name she can remember and she knows exactly what’s in there.
  • Next, take an inventory of your safe deposit box. (If you don’t have one, get one at your bank!) Yes, this means making the time to get to the bank and get to your box. While reviewing the contents you can write down notes on paper or your smartphone, take a picture of what’s inside, or even type up a list. I made notes on paper and then typed up a document at home.
  • Let others in your family know about your safe deposit box inventory and have it filed in a place they can find it.
  • What should you store in your safe deposit box? Things that are valuable and you need to hold on to, but that you don’t need immediate access to. Here’s a good summary of what to keep in there, and what not to keep.

Now you can relax and you’ll be ready when you need to find your vital documents.

How Do I Get Rid of: Shredding

This month I’ve been helping many clients get their financial files set up for the year, and get organized for tax time. Part of the process is getting rid of important or sensitive documents that you no longer need. The best way to do this is to shred the papers.

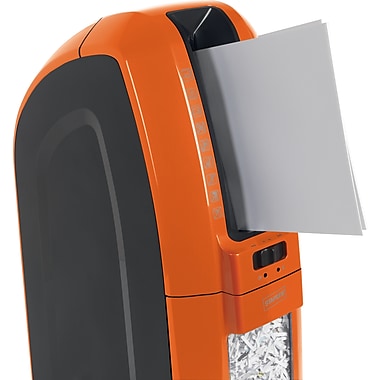
It seems easy to get rid of shredding, but so many times I see piles of papers left “to be shredded” on top of shredders. As it turns out, the shredders often don’t work, and the papers pile up.Staples Space-Saver 10-Sheet Cross-Cut Shredder

Got shredding? Here are some ways to get rid of it:

1. Get a new shredder that works. To keep up with once-in-a-while shredding needs, basic shredders work fine. This model is available in several fun colors and fits right on a small shelf with easy access.

2. If you have boxes and boxes of old documents to shred, outsource the shredding.

  • A great local resource is Doc Shredding Corp. They will come to pick up your boxes of shredding, and also destroy computer hard drives.
  • Check to see if your town offers any shredding days. My town holds a spring and fall Community Recycle Day and always offers free shredding services.
  • Bring your boxes of shredding to Office Depot or Staples for in-store shredding.

Don’t let piles of shredding build up in your home or office. Get a new shredder and get rid of the paper, or have someone else do the shredding for you.

Got Keys?

Always loosing your keys?  I often work with clients to set up a landing pad – a place where they ALWAYS put their keys, phone, and other important items.

But keys can get misplaced. If losing your keys drives you crazy, here are some creative ways to remember your keys:

Or get rid of the house keys all together: One of my clients installed a keypad number lock on all her doors, instead of a traditional key lock, because she always was losing her keys!  The other members of her family had the same issue and they happily agreed to get a keypad lock. I think this is a clever solution to an annoying problem.