5 Tips for International Travel

International travel is a wonderful experience. Make it easy to enjoy your vacation by taking these 5 steps before your leave: 

  1. Inform your credit card companies that you will be travelling internationally, including the dates you are away and where you'll be, so that they don't mistake your charges as fraudulent.
  2. Check to see if your phone will work where you are travelling. Determining this can get complicated. Does your phone use the cellular technology of GSM or CDMA? Does your cell carrier allow you to use your phone out of their network? I found this article very helpful for navigating what to do. 
  3. Make sure a trusted friend or family member knows where your important documents are at home, including a copy of your passport and what you are carrying in your wallet (see below).
  4. Clean out your wallet! You won't need all those store and membership cards, so take them out. Make sure you are only taking the most important cards with you. Consider making a photocopy of everything that is in your wallet and leaving it at home. In case you lose anything it will be easier to recall which credit cards you had with you.
  5. Consider using the Mobile Passport App. This free app, approved by U.S. Customs, let's you skip the line at some U.S. airports. Fill out the questionnaire on your phone and then go into the "Mobile Passport Control" lane at the airport.  

De-Clutter & Donate

I had written before about donating dance costumes, and was very excited to finally send off our first box of donations to Travelling Tutus Inc!

My daughter has been dancing for nine years, and recently we sorted out her dance outfits. She had fun attempting to wear some of her very tiny dance costumes, and we did put a few favorites aside to keep.

Then we had a small pile of costumes she wanted to donate, to help other kids love dance as much as she does. We're so excited that Travelling Tutus will put them to good use!

A Colonial Closet

This spring my family and I enjoyed visiting the Hampton House, a national historic house outside Baltimore, MD and managed by the National Park Service. Built in the 1780s, this Georgian mansion was once one of the largest homes in the colonies.

As we toured the lovely home and were in awe of the period furnishings, I noticed something interesting (at least to an organizer) on the second floor. This very large hallway had five grand bedrooms leading off of it, and in between each bedroom in the hall were built-in closets!

Perhaps the first built-in closets! Each closet was quite narrow and had pegs instead of the typical closet rod we see today, but I bet they were very fashionable and ahead of their time in the 1800s. Could you imagine if all your clothes hung from a few pegs? 

Shoe Storage Color Coding


I was visiting a friend's house for the first time, and she said to me "You'll appreciate this...and we walked to her closet." She proudly showed me how she turned a small closet, the second one in the master bedroom, into a space for storing shoes. 

This shallow closet wouldn't be great for clothing, but made an excellent home for shoes. Not only did she have the shoes in clear bins, she had devised a color coding system to identify which shoes were for work, casual, or sports. She simply used the multi-color stickers sold for tag sales. What a great idea! The color coding makes getting ready even easier. Love this idea!

A Simple Shelf Solution for Gardening Tools

When I moved in to my house we set up a folding table in our basement and I unpacked my gardening things. I thought I'd use the table as a potting area, but nine years later, it was mainly used for storage. And not very good storage: tools and sprays were scattered around on top, while pots and soil bags were lost underneath.

One of my organizing matras for my clients is "use the vertical space," and I finally applied this to myself. The addition of a sturdy shelving unit (from Costco) made all the difference in organizing my gardening tools. With the shelving unit I gained more space, and it was less deep than the table, making it much easier to see what I had. Since the shelves are adjustable, I arranged them to fit my large bins on the bottom. My hand tools are out in a bucket at eye level so I can quickly grab what I need. 

These shelves provide excellent storage and I had used them in other areas in my basement. When you need to add storage, don't forget to think vertical shelves. Happy gardening!


Creative Door Mat Storage

It's Spring and a great time to freshen up your home. One of my clients likes to swap out her front and back door mats with the seasons. We had found some mats as we organized the basement, and were looking for a way to store them. 

My client came up with this clever solution: hang each mat from a plastic skirt hanger. This keeps the mats from getting bent and makes them very visible = easy to find! She can hang them in her basement and always be able to find the one she is looking for. 

It was also a good way to use those extra hangers. 

Travel Idea for Jewelry

Friends were preparing for a year-long move to Europe last summer, and I noticed that the older daughter had a genius idea for how to organize her jewelry for travel. She separated out her jewelry and sets into small plastic bags. She punched a whole in the bags and then essentially "filed" them in a three-hold binder. (I think clear sheet protectors could work as well).

Using this method meant that the daughter could easily bring the binder in her carry-on luggage. Love this idea!

Tray Chic

Trays are a great tool for organizing: they keep items together (think remotes on an ottoman) and make it easier to retrieve things from a deep cabinet or move items off the kitchen counter.

From Ballard Designs

From Ballard Designs

I use trays all over, and find they are especially useful near the door for holding the essential items that get dropped every day: keys, phone, wallet, glasses. Now this chic tray from Ballard Designs makes it even easier to see what goes where. 


Repurpose a Shoe Shelf

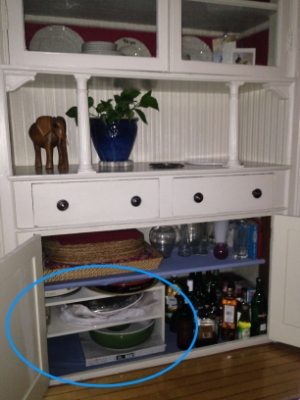
I have a beautiful original built-in china cabinet in my dining room, with storage on the bottom. I store place mats, some linens, vases, serving trays, and candles. It also functions as our bar cabinet. After the holidays I was putting away serving pieces and linens, and thought that my cabinet could use a little re-organization.

Things were piled up, and often fell over or got lost in the deep cabinet. I moved less-used linens to a dresser in our attic, and weeded out my vases, setting aside some for donation. As I was wishing I could have more shelves, I remembered that I had an old shoe shelf in the attic. After I re-did my closet, I didn't need the shelf but saved it thinking it might be useful at some point (yes, even professional organizers save things sometimes).

It was the perfect solution to add shelving in this cabinet! 

cabinet Before - Piles

cabinet Before - Piles

Cabinet After

Cabinet After

Cabinet after - shoe shelf adds storage!

Cabinet after - shoe shelf adds storage!

Holiday Decorations: Sort, Purge and Label

I love decorating for the holidays, but don't enjoy putting it all away. Here are 4 quick tips to make the process easier:

  • Sort: Keep categories of items together so it's easier to see what you have. I have separate bins for our outside lights, tree decorations, and holiday dishes/home decor. 
  • Purge: Only keep the holiday decorations that bring you joy and you love to use, year after year. Discard or donate items you don't use. If an item has sentimental value, consider taking a photo and then passing it on.
  • Use the right containers: My sturdy green bins work great for storing holiday items in the attic. Replace old flimsy boxes with plastic containers. You can also purchase a variety of storage containers made to hold holiday items. 
  • Label: While it was easy to get out the holiday decorations, I always had trouble figuring out what went in each bin to put it back. This year I decided to label the bins with a list of all the categories inside. This will really help next year!


Resolve to Reset

According to the dictionary, "reset" can mean to set anew, or to start again.

I like to apply this to getting organized because "being organized" is not a static state, as Kathy Waddill notes in The Organizing Sourcebook. Life events will inevitably cause our organizing systems to get off track. This includes major changes like moving, a new job, or having kids, and shorter-term events like coming home from vacation, feeling too busy, or getting over a cold. So in the course of living our lives, we can't help but flow from organization to disorganization. Being aware of the need to reset - to put things back in place or take time for regular tasks and start anew - is the secret that will help get you back to the state of "being organized."

This year, make a goal to regularly reset some area of your life that seems to be causing you distress. Here are some possible reset resolutions:

Bookstack.jpg
  • Clear your desk at the end of the workday
  • Pick up the toys (with the kids if they are old enough) at the end of every day
  • Take receipts out of your purse/wallet/bag each week
  • Fold and put away the laundry each time it is done
  • Unpack within 24 hours after returning from a trip
  • Put away the holiday decorations
  • File papers weekly or monthly
  • Process your mail every day
  • Purge your clothes each spring and fall, keeping only what you love to wear

What area in your life seems to be the most disorganized? Make a reset resolution and see what changes. Let me know how you do!

Resources

This post is adapted from an article that appeared in the January 2009 edition of the Neat Sheet. Sign up for organizing inspiration from the Neat Sheet here.

15 Minute Organizing: Kitchen Utensils

Here’s a quick organizing project to clear through some kitchen clutter: organize your utensils.

  • Pull out all the utensils and tools, and put similar kinds together. You may discover that you have 5 spatulas and no whisks.
  • Pare down and only keep those that you really love to use.
  • Get rid of anything that’s broken. Donate good utensils that you never use.
  • Find a large enough jar to store them on your counter, or designate a drawer.

I like to keep the tools I use all the time out on the counter in various containers so I can quickly grab them while cooking. Yes I may have more than you’d expect, but they really all get used.

I keep the small ones in a small, colorful vase so they don’t get lost in the bottom of the larger container or back of a drawer. All the utensils sit right next to the stove within easy reach.

Tea Cozy (Corner)

One mantra for staying organized is to “keep like things together.” This is a key rule for the kitchen. I’ve got drawers designated for my food storage containers, a cabinet for spices, and a spot for making tea. I’m a daily tea drinker so one small cabinet contains tea, honey and the sugar bowl. My most-used tea stays in a small bin (made for kitchen cabinets), which I can pull down to select which tea bag I want.

IMG_4118_thumb.jpg

This tea cabinet is next to a larger cabinet with all the mugs and more specialty teas. On the counter underneath is the electric kettle and the tea pot, sitting on my favorite plastic tray. By keeping items on the tray I can quickly move the tea pot and kettle to a different area if I need more room on the counter.

(Don’t worry, coffee gets it’s own place in the kitchen too. My husband is the coffee drinker and makes a pot almost every day. The coffee maker, grinder, filters and his thermos stay together on a tray in the pantry.)

Need help with your kitchen? We can weed through the clutter and create a space you’ll love. Contact me today to get started!

Keep Your Spices Organized

Like to cook? Then I’m sure you have a lot of spices. There’s a misconception that organized people must alphabetize their spices. While that’s one way to find what you need, another way is to use the organizing strategy: make it visible and easy to store. There are many ways to effortlessly store your spices. Some kitchens have special pull-out drawers or drawer inserts. In my kitchen, I use a tiered stand in my cabinet.

Other key tips: I also put spices I use more often in the front, and less used in the back.

I also only keep what I really need and use. When you can’t find what you want, clean out your spice area.

Here’s another great idea to make spices visible from one of my clients. She keeps her spices in a pantry/closet in her kitchen. The pantry is pretty deep, but she grouped her spices into a clear container. By keeping the top off, the container can easily slide out like a drawer. She can also pull out the whole bin when she’s cooking.

Since the client looks down at the drawer of spice, she printed round labels for the top of each spice container.

Don’t want to create you own labels? The Container Store has pre-printed ones ready to go!

Need more inspiration? Read this post on my Blog.

Do this one thing to make it easier to find your summer clothes

Before you put your summer clothes away for the season, do this one thing: make a "vacation clothes" bag. 

While putting away summer clothes for the season, my client realized that she'll probably be heading somewhere warm this winter. We wanted to be sure she could find her vacation/resort clothes easily, without having to dig through the whole bin of summer clothes. 

Solution: We put the clothing she'd probably want to pack right on top of the bin in a clear, zippered bag labeled "vacation clothes." Now she'll be able to find her clothes for a warm getaway in a snap. 

This article first appeared in the Neat Sheet. Not on my list for the Neat Sheet? Click here to subscribe and get more tips and tricks to tame the chaos and stay organized. 

The Secret to Clearing Kitchen Cabinet Clutter

Large kitchen cabinets are easy magnets for clutter. Items get lost in the back and it’s hard to see what you’ve got stored in there.

In my client’s kitchen, the base cabinet had to function as the pantry; there was no other space to store food items. It was a typical cabinet configuration with one shelf in the middle. Cereal boxes, canned goods and boxed items were jumbled and hard to retrieve.

Often I try to use items clients already have in their house for storage, but sometimes there is the perfect product to solve a problem. In this case, the solution was a stand-alone elfa drawer unit from The Container Store.

KitchenCabinet2_thumb.jpg

Designed specifically to fit in the cabinet, two of these drawer units filled the space, providing new storage and ease of access. We labeled the handles to know what category  of food (baking, snacks, dinner) to store in each drawer. There was even space on one side for the tall cereal boxes. Perfect!

The other option for this kind of cabinet is to install pull-out drawers. However, my client rents his home and couldn’t install any permanent solution in the cabinet. And when my client moves, he knows he can find another spot to use these stand-alone drawers.

Not convinced about drawers? Read here for more on why I love drawers in kitchens.

A Simple Solution: Pull-Out Drawer

A simple pull-out drawer: that's all it took for my mom to be able to use her kitchen again.

Last winter my mom, who is in her 70s, hurt her back, and getting pots and bowls out of her kitchen cabinets became nearly impossible.  As she recovered, I helped re-organize her kitchen to make it easier to use. At one point she said "I wish there was a way to get to the way back of the shelf without having to get down on my hands and knees."  I had no idea what she had to go through to find items in the back and lift out heavy pots.

Right away I knew that adding simple pull-out drawers was the answer.

I measured her cabinets and in one trip to the Container Store for these metal shelves , I had everything we needed. My husband and I easily installed the drawers in her cabinets, and they were ready to use. The drawers glide out effortlessly, so my mom can access what is in the back, without having to get down on the floor. Each drawer has a locking mechanism so when it is pushed back in, it stays in place.

Pull-out drawers are made to solve the problem my mom faced in her kitchen.

If you want to make your kitchen more functional (as I've written about before), consider adding pull-out drawers. Drawer options include the metal ones I used and bamboo drawers from The Container Store, or custom designed drawers from the company Shelf Genie.

This article first appeared in the September/October 2014 edition of The Neat Sheet. Sign up to receive the Neat Sheet newsletter here!

Organizing Receipts, Warranties & User Guides

Recently we had a week where it seemed like everything was breaking: my car, the garage door, and our back door lock. While looking for the receipt for the door I realized that my house information was in too many different spots. I had the papers saved in some files and binders, but couldn’t quickly find what I had needed. Time for a new system.

First, I gathered all the information I could find into a pile.

Then I started to sort,making piles for the warranty/user guide information, for receipts, and for other bills related to home maintenance.

My pile turned into the following files:

IMG_5462_thumb.jpg

1. Owner Manuals file: this includes warranties and all the information that comes with a new device or appliance. 

IMG_5461_thumb.jpg

For large purchases, like a TV or washing machine, I recommend stapling the purchase receipt right to the user guide/warranty information. If something happens to break under warranty you’ll have all the information you need in one spot.

2. Home Maintenance and Improvements file: This is where the receipt for the door went, along with all the other work we’ve had done on the house such as window replacements, carpet installation, and painting. This file will help me recall who did the work and when, and also helps us to keep track of improvements we’ve made to our property.

3. Outside Improvements file: This is for any major outside projects, such as our fence installation and patio.

4. Important Receipts to Keep: This is a bit generic, but any purchase receipt that I want to archive goes here. This includes receipts for lighting, furniture, electronics, and a few sentimental receipts.

Each category is a hanging file in my file cabinet, right next to each other. If I’m looking for product information or an important receipt, it should be in this section of the file cabinet.

If you want to set up a similar system but don’t know how to get started, contact me today at 617-905-7762

Organizing for School Lunches

School starts next week in our town and I’ve already been hearing many mom friends lament that it will soon be time for the arduous task of making school lunches. For many this seems to be quite a chore, so here are 5 ways to streamline school lunch-making:


  • Have your fridge and pantry set up for easy lunch making. Here’s one idea for using clear bins in your fridge. I have a “snack” bin in our pantry; my daughter knows that she can select 1-2 items from the bin for her lunch.  Also have your containers and wraps easily accessible in your kitchen. Here’s my organized food container drawer, which makes it easy to find what we need.
  • Devise an easy “recipe” for school lunches. As I mentioned, we came up with a formula of 2 fruits, 1 veggie, 1-2 snack items + sandwich and a drink. Find a formula that works for your family. You may end up packing nearly the same thing every day and if your child likes it, great!
  • Empty lunchboxes when kids get home from school each afternoon. There is nothing worse than opening a lunchbox or container and finding the smelly remnants of a previous meal. If lunch boxes get emptied and cleaned every day (have your kids do this!) they will be ready for filling that evening or the next day.
  • Have your kids buy lunch at school. This plan saves many families, even if the kids buy lunch only 1-2 days a week. At my house I print out the monthly lunch calendar and my daughter looks ahead and circles the days she wants to buy lunch.
  • Finally, don’t forget to get input from your kids on what they want for lunch. Sometimes my daughter has asked for surprising lunch items based on what she’s seen friends eat at school.

What are your clever solutions for school lunches?

Batch Your To Do’s

I’ve written before about how to chunk or batch your to do’s and errands. Today I took my own advice and got 5 bags of stuff out of my house, all in one hour.  I’m fortunate to have found great local resources to take my unwanted items:

  • Dropped off my daughter’s outgrown clothes and a few toys at my favorite place, The Little Fox Shop
  • Donated a big bag of books at The Book Rack
  • Brought more clothes and miscellaneous housewares to the Goodwill drop-off site at the grocery store

Once you’ve made the decision to donate or pass on something, try to get it out of your house as soon as you can. If you need help finding local resources, email me today.