How Do I Get Rid Of: Stuffed Animals

Last year I had fun with monthly posts in my “Favorite Container” series. For 2014, I’m staring a new monthly series, “How do I get rid of….”   Each month I will share tips and resources to help you get specific items out of your home; those hard-to-get-rid-of items that clients always ask me about.

This month I’m tackling a tough one: stuffed animals. Clients ask me all the time how to get rid of stuffed animals, since many of the organizations we typically donate to don’t accept stuffed animals.

Here are some local organizations and thrift stores that do take donations of stuffed animals:

  • Solutions At Work/Children’s Clothing Exchange – Cambridge, MA. This organization seeks to break the cycle of poverty and homelessness by providing business attire, computers, and children’s clothes and toys to those in need.
  • Global Thrift Store – Waltham, MA + drop off boxes.
  • Savers – various locations. This chain of thrift stores also works with non-profit community partners.
  • Urban Renewal Thrift Store – Allston, MA.
  • Project Smile – Hopedale, MA. This non-profit organization donates stuffed animals, coloring books/crayons, small toys and children's reading books to police and fire departments for police officers, fire fighters and paramedics to give to children involved in traumatic situations.
  • You can also ask your local shelter, fire station, or police department to see if they take donations of stuffed animals to give to children in emergencies.

Be sure the stuffed animals you are donating are in great condition and clean.

Have I missed someplace? Email me at elizabeth@thatsneatorganizing.com and I can add the organization to the resource list.

Thanks to my colleagues in NAPO-New England for their suggestions.

New Year, New Closet – Part 2

Last week my elfa closet system was installed and I couldn’t be happier!

After my husband worked so hard on getting the ancient plaster walls repaired in the closet, we decided to have an elfa installer put in the system. My installer was amazing: he was used to working in old homes and was able to use every inch of space.

It’s amazing what a difference it makes when your clothing hangs from the rod facing you, instead of an angle as it used to be (see “before” photo below). I can see everything, and I also noticed how many pairs of pants I have that I haven’t been wearing!

BEFORE    READY AND WAITING

ELFA INSTALLED  A NEW CLOSET

While my closet may look full, I have so much room in between clothes hanging on the rods; items aren’t stuffed in as they were before. I nearly doubled my hanging space. And I love the new pull out shoe shelves. All the components are adjustable, which is a huge plus in a closet.

Do you have a closet system that works for you? What’s your secret to an organized closet?

I have not received any compensation for this post; I am just very happy with how my elfa closet system turned out.

New Year, New Closet – Part I

This year I’m getting a new clothing closet, and I couldn’t be more excited!

I’m fortunate that my 1890s home actually has two closets in the master bedroom, so I have one all to myself. It’s a decent sized closet, but the space was definitely not utilized to its fullest. And like so many closets around here it had one single shelf across the top, and two rods perpendicular to each side – not even straight across!

My fabulous husband is repairing the cracked plaster walls of the closet (see him on Ask This Old House) and then we are going to install an elfa closet system from The Container Store.

The Container Store offers all kinds of adjustable elfa components for “reach-in” closets and I’m in the process of designing one with my local store. Many of my clients rave about elfa so I am looking forward to having a system that utilizes all the space in my closet.

Here are photos of everything that I took out of the closet, and what the empty closet looks like “before.”  Stay tuned for after photos.

Organizing Holiday Lights

Do your holiday lights look like the tangled mess from the movie Christmas Vacation?

I’m always looking for new ideas to store lights and other holiday decorations – anything that helps make it even easier for the next year.

Here’s my run down of some ways to keep your lights organized for the next holiday season:

  • For a simple DIY solution, wrap strings of lights around empty round oatmeal containers.  My husband has been doing this with our Christmas tree lights and it works well. The light-wrapped containers go into a bin, cushioned by tissue paper.
  • Here’s the same idea in a light storage bin you can purchase from Amazon.com.
  • Another easy home-made option is to wrap lights around flat pieces of cardboard (See an example from Martha Stewart).
  • I just saw this storage bin from The Container Store and am intrigued with how it works. I like that the bin comes with removable cord wraps.
  • Or make your own similar container by inserting tension rods into a plastic bin (See example on Better Homes & Gardens).
  • I also like the idea of this product with large reels and a round container to stack the reels.  I find that similar reels work great for extension cords, so this may be a good solution for bigger outdoor lights.

From pre-made products to DIY ideas, there are many options to keep your lights tidy.

What are your tips for organizing holiday lights?

De-Clutter and Gift Idea: Kids Artwork

Looking for a last minute gift idea that also helps you de-clutter? Grab the latest pile of artwork from your kids and turn it into gifts! 

Here are a few ideas:

  • Turn art into placemats: print color copies and have them laminated at an office supply store. I got this idea from a place setting doodle my daughter colored in (and labeled all the foods on the plate). I made a placemat for us and one for each of the grandparents’ houses too.
  • Create personalized wrapping paper through Zazzle; you upload photos but could also do this with photos of your kids’ creations. (Wish I had found out about this earlier!)
  • Turn the creations into a photobook on Shutterfly or another similar service
  • Have your child select a few pieces and toss them into an envelope. Add a bow and you’ve got a gift every grandparent would love.

Favorite Container #12: The Keyring App

For the last installment of my year-long Favorite Container series I am highlighting an app that helped me to organize and “contain” my store loyalty cards: Keyring.

In 2010 I wrote about a great card holder for store cards. I got many compliments and queries about the card holder, and for three years it was the perfect old-school solution for me.

But since I’ve got this iPhone, I thought I should explore new ways it can make my life easier. The Keyring app does just that. It’s easy to scan and load your card information on to the app, which then stores the barcode or information. When you are at the store the clerk simply scans the barcode from your phone…and you don’t have to hassle with finding the right store card or sharing your phone number. It also works for storing my library card! The app is available for the iPhone, Android and Windows 7 phones.

What apps have made your life easier this year?

De-clutter & Donate: Household Goods Recycling of MA

As part of my ongoing project to clean out my attic, today I donated our old crib mattress to Household Goods Recycling of Massachusetts (HGRM).

The mattress was in good shape and could definitely benefit someone else, so I was thrilled when I found out HGRM accepts mattresses. The non-profit organization collects used goods and distributes them to families in need; families are referred by social service or government agencies.

Donating to HGRM is easy. Read their donation guidelines.  They accept a lot of household items that other organizations don’t, like mattresses, toddler beds, TVs and air conditioners.

To donate:

  • Drop off items at their warehouse in Acton. Just drive up to the doors around the back and there will be a crew of people helping to unload your items and issuing you a receipt on the spot. I was done in less than 10 minutes!
  • Call HGRM to pick up your large furniture or appliances, but read the guidelines first.

10 Strategies for Organizing your Attic (or any space you've been avoiding)

This article originally appeared in the November/December 2013 edition of The Neat Sheet.

"This is the year the attic is getting cleaned out!"  While I seem to utter those words to myself every year*, I was determined that in 2013 I really would get the attic cleaned and organized.

Recently we updated my daughter's room, and the attic slowly got stuffed with her old furniture, plus outgrown toys and clothes. That was combined with the usual boxes, papers and other random items that get "stored" in the attic. Finally, there wasn't room for anything more!  So for the past month I have been diligently working on my own organizing job, and it's almost done.

Here's what I've learned along the way:

  • Make a date to start your organizing project. I scheduled an organizing session with myself - even put it on my calendar. It really helped me get started.
  • Gather supplies. My supplies included: paper and pen for notes; sticky notes to quickly mark boxes or items; gallon-size plastic bags for storing small things; empty trash bags; empty boxes and bags for donations; and my smartphone to look up donation guidelines from several organizations.
  • Take stock of what you are storing. For my first attic session, I looked around to see what had accumulated, and got a sense of what needed to be done. This was more of an assessment and planning session.
  • Break the project down into smaller steps; maybe make a list. After I took stock I made a list of smaller projects that I could do in short time periods. My attic projects included making decisions, selling items, sorting and purging boxes, moving some of the furniture we had stored in the attic around, and giving away items. I was as specific as possible so I'd remember what needed to be done the next time I worked on my project.
  • Purge the easy stuff first, the "low hanging fruit" as some of my clients like to say. After taking stock and making my list, I went through and did the easy stuff first: threw out trash, pulled out boxes we had been storing and recycled them, and started putting the items to sell in a pile.
  • Keep making dates to work on your project. I kept going by working on my attic in whatever downtime I had during the week, and even on the weekend while my daughter was at some of her activities.
  • "Decide to Decide" as Kathy Waddill notes in her book, The Organizing Sourcebook: Nine Strategies for Simplifying Your Life. There were many things in limbo, waiting for decisions. Well, my husband and I made the choices for what to do with all things! Some were sold, others given away, and a lot donated.
  • Once you've made the choice to get rid of items, get them out fast! Although I shed a few tears for some of the baby things that were getting sold and donated, I tried to get the items out of my house as quickly as possible.
  • Keep similar things together and create zones for what you are storing. Some of the zones in my attic are: off-season clothes, furniture, travel bags, holiday decorations, kid stuff (clothes, dolls, toys, and books in separate boxes), and  work-related books and products.
  • Check in on your newly-organized space at least once a year. Life happens, and even if your attic is organized now, it may not always be that way! If you've put in all the work to get it cleaned out, be sure to revisit what's in there at least once a year.

Have you tackled organizing your attic? What worked for you? I'd love to hear your ideas!

*The attic has been an ongoing organizing project of mine for the past 5 years. First, I organized 4 years of my daughter's artwork just before she started Kindergarten. The following year we had to have some re-wiring done in the attic, which meant every single thing was moved around...so I took a little time to clean some of the "stuff" out. Then 2 years ago I purged the 6 bins of clothes I had saved from my daughter. I also started to clean out baby toys, but never finished. I'm happy to be on my way to having it done in 2013!

Saving Special Recipes

Many families have recipes that have been handed down through the generations. I love this idea to preserve a special recipe with a photo! Such an easy and fun way to hand down memories.

You could also display those heirloom family recipes in a simple frame, keep them in a special recipe box, or print them on dish towels. If you wanted to share the recipes with many family members, scan the recipes to your computer and then create an online book using Shutterfly or similar service.

Speaking of recipes, here’s how I organized mine a few years ago.  This post may need an update after the holidays: now I have to find a good way to keep track of all the recipes I’ve pinned on Pinterest!

Wishing you and your family a very Happy Thanksgiving!

Favorite Container #11: Food Storage Container Drawer

“What do I do with my Tupperware®/food storage containers?” is one of the top questions I hear from clients when organizing their kitchen.

And with Thanksgiving around the corner (= leftovers), I thought it would be appropriate to focus on the food storage container drawer in my kitchen for this month’s post in My Favorite Container series.

Yes, a drawer can be a “container.” I’ve already highlighted my kitchen’s flatware organizer drawer…and another favorite part of my kitchen is the deep drawer where I keep my food storage containers.

Here are my tips for keeping your food storage containers organized:

  • Store in a drawer. A drawer is the best spot for food storage containers. It’s so simple to open the drawer and then see what you have. (Much better than having stacks of containers tipping on cabinet shelves.) Just make sure you can easily access the drawer.
  • Purge the containers you have. Do you really need stacks of leftover delivery containers? Do all your containers have a matching lid? Keep only the containers you use all the time.
  • Find a kind you like, whether glass or plastic, and then if you need to buy some new ones, buy similar shaped containers. Squares stack and fit well in a drawer, but as you can see, I also have some round containers as well.
  • Stack containers by shape. You can see my stacks of containers in the drawer. Makes it pretty easy to see what goes where. On the right side of the drawer are the smallest containers for my daughter’s lunch box.
  • Corral the lids in one container. Then it’s easy to see what you have. Or use the kind of containers where thelids stick to the bottom. You can also use drawer dividersto section off the lids in the drawer.

Wishing you many happy leftovers!

Got Keys?

Always loosing your keys?  I often work with clients to set up a landing pad – a place where they ALWAYS put their keys, phone, and other important items.

But keys can get misplaced. If losing your keys drives you crazy, here are some creative ways to remember your keys:

Or get rid of the house keys all together: One of my clients installed a keypad number lock on all her doors, instead of a traditional key lock, because she always was losing her keys!  The other members of her family had the same issue and they happily agreed to get a keypad lock. I think this is a clever solution to an annoying problem.

Favorite Container #10: Medicine Cabinet Organizer

The medicine cabinet: a space you probably don’t think about often, but it’s one that you use several times a day.  Here’s a great product to help keep it tidy!

A few years ago when I was trying to de-clutter my medicine cabinet I found this amazing shelf organizer. We had lots of small items in our cabinet and it was a challenge to keep them all together.

Usually I like to re-purpose items but the shelf organizer was made to fit on the narrow shelves of a medicine cabinet. It worked so perfectly to corral all my small items.

Such a simple product, but it works and make finding things so much easier.

You can find many styles of medicine cabinet shelf organizers at the The Container Store or amazon.com.

De-Clutter & Donate: Anton’s Cleaners Coats for Kids

It’s that time again – time to go into the back of your closet and see what coats you can donate to Anton’s Cleaners Coats for Kids program. I know my daughter outgrew her winter coat last year, so I’m ready to pass it on.

This year Coats for Kids will be collecting coats from October 14th through January 11th. Coats will be cleaned and then partner organizations will distribute them to families in need throughout the Greater Boston area.

Great Tip for Grocery Shopping

In the recent edition of my email newsletter, The Neat Sheet, I presented some tips for grocery shopping. I got some great responses from readers about that article.

Here’s one idea that I just had to share: this mom gets her boys to do some of the shopping! Her boys are in elementary and middle school so they are able to read a list and find the items. She sends them to get an item that’s an aisle or two ahead of where she is.

The mom noted that “it keeps them busy, gives them a sense of ownership (we are shopping because they get hungry too), and keeps them from arguing too much.” 

I love this idea because it builds the boys’ independence and responsibility, and anything that can reducing the arguing is a good thing!

Thanks for the great tips.  Feel free to email elizabeth@thatsneatorganizing.com your great ideas!

Favorite Container #9: Closet with Adjustable Shelving

A closet is one of my favorite containers for organizing the home. Whether it holds food, clothes, toys, games, party supplies, or winter coats, the closet is an important tool for keeping chaos at bay.

And I don’t mean because you can stuff things in and simply shut the door! A closet can provide a ton of storage. I’ve found that one of key elements to a functional closet is having shelving, and preferably, adjustable shelving.

I like adjustable shelving because it gives you the flexibility to move the shelves based on what you are storing. While fixed shelving (often in bedrooms) is better than no shelves at all, installing shelves that can move helps the closet adjust to whatever you decide to keep inside.

For example, the closet in my family room is filled with arts and crafts, photo albums, sewing items, and gift wrapping supplies. I was able to cut and install the shelving to fit perfectly around my Rubbermaid Wrap n’ Craft storage container.  But if I end up storing games or something else in here, I can lower the shelf height and use a longer shelf piece.

One of my favorite projects was converting our barely-useful hall closet into an awesome storage space. Originally this closet had the typical clothing bar and one high shelf, with a huge open space underneath. Suitcases, bags, the vacuum and my husbands work clothes ended up there, but there was a ton of unused space.

After installing adjustable shelves, this closet not only holds clothes, but also all our travel items, the beach towels and bags, and extra bedding. We picked the shelf height based on what we were going to store inside.

As soon as the cracked walls in my bedroom closet are fixed, I can’t wait to try out elfa shelving from The Container Store. Stay tuned for more on that project.

The bottom line: If you are creating a closet from scratch or re-doing an old closet, install adjustable shelving.

Kids Clothing Organizer

It’s back to school time! While I’m excited for the return to a more regular routine, it also means back to overseeing homework, packing lunches, and making sure the favorite shirt is clean.

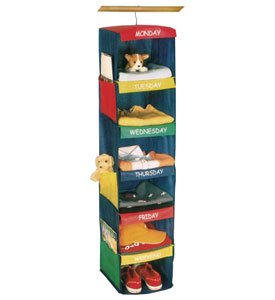
One way to avoid arguments in the morning about what your child is wearing to school is to use an outfit sorter. It hangs from the rod in the closet and provides a slot for each day of the week. Your child chooses their outfits for the week ahead of time, maybe on Sunday (or the night before) and puts everything into the slot. Then in the morning it is so easy to grab the clothes and get dressed!

Not only does this pre-planning help alleviate some of the morning stress, it also teaches your child to be more independent.  It also helps you both find out if the favorite shirt is in the wash, avoiding last minute frustration.

Here are a few examples of clothing organizers:

For more on organizing your child’s room, check out my video from This Mom Needs Help!

Favorite Container #8: Desktop File

This month, August, I’m back to thinking about papers as the start of school approaches. I’ve been filling out school-related forms, signing my daughter up for after-school activities, and receiving lots of information from her new teams and groups.

My all-time favorite container for organizing papers and projects is a desktop file box. Here are the details:

What:  A box that is designed to hold hanging folders and files, and can sit on your desk or kitchen counter.

When to use it: Use this kind of box for your key files – files that you need to see all the time, and for current projects. My desktop file box always has these folders in it:

  • Camp Ideas (for my daughter)
  • Activities (for my daughter – things she may want to try)
  • To Buy
  • Family Meeting (any papers that my husband and I need to discuss)
  • Current Projects – Home (colors for a bedroom, estimates from the painter) Current Projects – Work

How to use it: Create hanging file folders for the key papers you tend to hold on to – not for every one, but what are the general categories of papers that end up on your counter or desk? Once you have the categories set, you can use individual manila file folders to separate papers inside the hanging folder if needed. Note: The categories may change over time as you see what kinds of papers you have, so don’t be afraid to change the folders.  No system is perfect at the beginning – you need to live with it and use it for a while to see what works.

Why to use it: A desktop file box helps move your papers from piles to vertical files, making them much easier to see! When you can see your papers, you can actually take them out and use them…and have a place to put them away.

Where to purchase: Basic desktop file boxes can be found at Staples and Office Max. Look on Amazon.com and The Container Store for file boxes in fun designs and natural materials.

See how a client set up her own Desktop File box in this blog post. For an idea on how to organize your financial papers, check out this recent Favorite Container post.

Clearing Kids Room Clutter

Weed Constantly. To keep kids’ clutter at bay, I find “weeding” to be one of the most important strategies.

“Weed Constantly” is Strategy #3 in Kathy Waddill’s The Organizing Sourcebook: Nine Strategies for Simplifying Your Life (p. 85). This is one of my favorite organizing books because the ideas are accessible and really make sense.

I was reminded of the importance of weeding while working on my daughter’s room recently. Last week we came home with a few bags of new fall clothes for the start of school, but the dresser, closet and “clothes to grow into” bin were pretty full. Before putting the new things away, I started pulling out tops, skirts and pant from the dresser and asking her “does it still fit?”  There was some trying-on, but mostly we knew what had gotten small over the past few months. Not satisfied with the dresser, I also moved on to the closet – taking out the PJs, sweatshirts, dresses dance leotards, and soccer gear. And don’t forget about the shoes pushed way in the back of the closet, a sure sign that they no longer fit.

I was pretty shocked that even though we had sorted out the “too-small” clothes back in May, there were still a lot that now didn’t fit. I ended up with two bags of clothes, and happily took them to the my favorite local consignment store, The Little Fox Shop.

Since kids grow so quickly, weeding their clothes often is critical to maintaining an organized room. My rule is to get out clothes that don’t fit right away. Even if the clothes sit in your attic, garage or car for a bit before moving on to their next destination, getting them out of your child’s room is key.

The Party Closet

This week I helped a client clear a lot of post-vacation and post-party clutter that was in her living room, dining room and kitchen. One of the most fun projects (yes, I think organizing is fun!!!) was tidying up her Party Closet. 

This client is fortunate to have two large closets by her front door. One is used for coats, and the other stores party items—what I now call the Party Closet. 

The client told me she created this party storage area 15 years ago and it really works. It’s a brilliant idea if you have the space.

What makes this work?

  • It’s a great location. It is right outside the dining room and kitchen, where these items are used.
  • While some families may need the second closet for coats, this client has several kids and hosts all kinds of parties, at her home and at other venues. It’s a good use of space for her.
  • She uses every inch of space in the closet: her tablecloths are stored on hangers hung from the clothing bar. The party serving wear is stored on the top shelf. On the bottom are clear labeled bins filled with party napkins, paper plates, serving wear, and utensils.
  • Everything can be easily seen, removed and put away.

I was so inspired by her idea I had to share it!